Introduction to Claude AI-Assisted Web Development for Beginners
1 Subscribe to "Claude Pro"
Visit https://claude.ai/upgrade, or go to https://claude.ai/, sign in, and choose the Pro plan.
2 Install the Claude Desktop App
Download the Claude desktop app for Windows from https://claude.ai/download. Install the app, launch it, and sign in with your Claude account. You will work in the app's Code tab.
3 Configure Claude Permissions
Open Settings > Code, scroll to Local development, and turn on Allow bypass permissions mode.
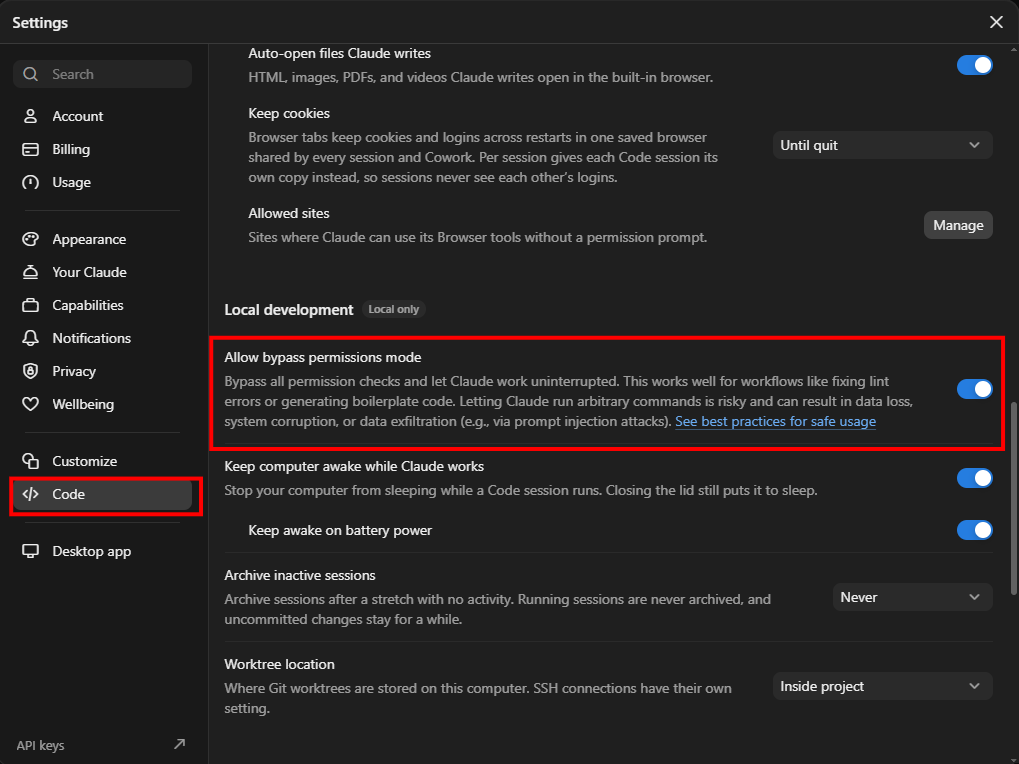
Note: Bypass permissions mode lets Claude run commands and edit files without asking you each time. Only use it on your own computer for projects like this one.
4 Set Up the Local PHP Web Server, Python, and Node.js Runtime
Restart Claude as Administrator
The setup below installs the Hearth web server as a Windows service, which requires Administrator (elevated) permission. So before you begin, restart Claude as Administrator.
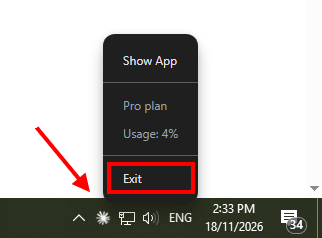
1. Exit Claude: right-click the Claude icon in the Windows taskbar notification area (system tray) and click Exit.
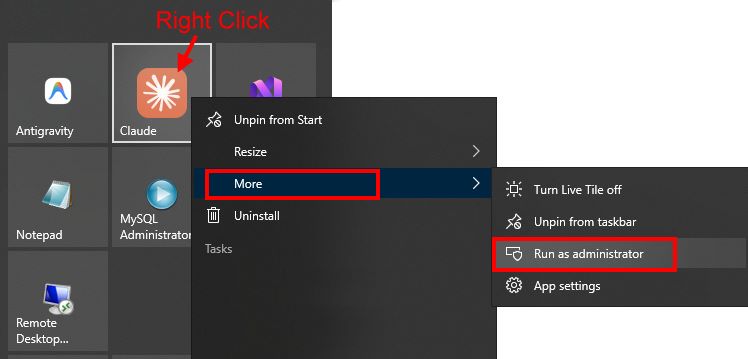
2. Run as Administrator: open the Start menu, right-click Claude, then choose More > Run as administrator. Click Yes if Windows asks for permission.
Run the Setup Prompt
Start a new session in the Code tab. Select Sonnet 5.5 [Low] as your model, and set the permission mode to Bypass permissions.
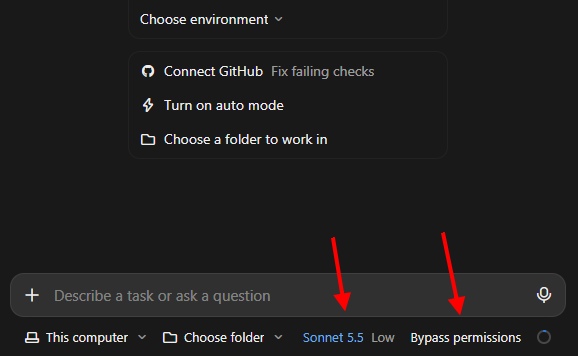
Choosing a model: Claude Sonnet is fast and good for everyday coding. For highly complex tasks, you may switch to Claude Opus, which is much more capable of handling complex work. However, it uses far more tokens, so your usage quota will run out much faster than with Claude Sonnet.
Copy and paste the following prompt into the chat input box:
Download the latest release of each program:
Hearth Portable Web Server (choose the zip with "Bundled-PHP-Python-NodeJS" in its name):
https://github.com/ASP-NET-Web-Forms-Club/Hearth-ASPNET-Server/releases/latest
MCP-Browser:
https://github.com/adriancs2/MCP-Browser/releases/latest
MCP-SQLite:
https://github.com/adriancs2/MCP-SQLite/releases/latest

Save above programs into C:\tools\
and extract them into respective folders of:
C:\tools\hearth-web-server\
C:\tools\mcp-browser\
C:\tools\mcp-sqlite\

check whether python, pip and node.js already work on this computer (from any folder) by running python --version, pip --version and node --version (ignore the Microsoft Store "python" shortcut in WindowsApps, it is not a real install). For each one that does not work, add its runtime folder into user PATH; skip the ones that already work:
python: C:\tools\hearth-web-server\runtimes\python\
pip:    C:\tools\hearth-web-server\runtimes\python\Scripts\
node:   C:\tools\hearth-web-server\runtimes\node\

Install MCP to the Claude desktop app
add this to %USERPROFILE%\AppData\Local\Claude-Data\claude_pzs8sxrjxfjjc\claude_desktop_config.json
(older installs: %APPDATA%\Claude\claude_desktop_config.json). Find whichever exists on this computer; create the file if it does not exist, and keep any existing settings.

{
  "mcpServers": {
    "mcp-sqlite": {
      "command": "C:\\Tools\\MCP-SQLite\\MCP-SQLite.exe"
    },
    "mcp-browser": {
      "command": "C:\\Tools\\MCP-Browser\\MCP-Browser.exe"
    }
  }
}

Configure Hearth Web Server as a Windows Service:
1. Create C:\www\ if it does not exist. create first php home page C:\www\index.php , "Welcome to my first PHP page".
2. Replace C:\tools\hearth-web-server\manager_sites.json (delete all default websites) with a single PHP site entry:
   - "Engine": "PHP"
   - "Port": 8090
   - "Root": "C:\\www"
   - "AutoStart": true
   - "AutoRestart": true
   (Leave "Executable" empty to use the bundled runtimes\php\php.exe automatically.)
3. Run elevated (Administrator) PowerShell to install and start the service:
   - Service Name: HearthManagerService
   - BinaryPathName: "C:\tools\hearth-web-server\HearthPortableWebServer.Manager.exe" --service
   - StartupType: Automatic
   (If HearthManagerService already exists, stop and delete it first, then run New-Service and Start-Service.)
4. Verify HearthManagerService is Running and port 8090 is listening.
5. create shortcut to desktop to start HearthPortableWebServer.Manager.exe.
By this point, your local PHP web server is set up and running. Open a web browser and visit http://localhost:8090 - you should see the page displaying "Welcome to my first PHP page".
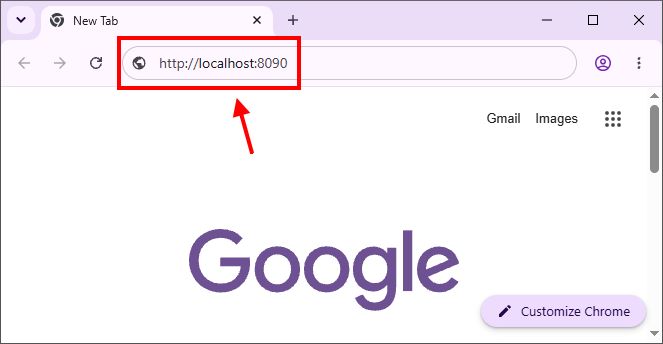
http://localhost:8090 in your browser's address bar to verify the local PHP server.5 Restart Claude and Verify MCP Tools
To ensure Claude loads the new claude_desktop_config.json configuration and updated PATH environment variables, quit and restart the application.
Right-click the Claude icon in the Windows taskbar notification area (system tray) and click Exit (the same way as in Step 4), then reopen Claude normally. Administrator permission was only needed for the setup.
After restarting, start a New session and enter the following prompt:
Are you able to see mcp-browser and mcp-sqlite?- If the AI answers "No", restart your computer so Windows applies the environment changes, then test again.
- If the AI answers "Yes", proceed to the next step.
6 Locate Your Web Files & Build Your First Website
Your website files are stored in C:\www\.
To view them, open File Explorer and navigate to This PC > Local Disk (C:) > www.
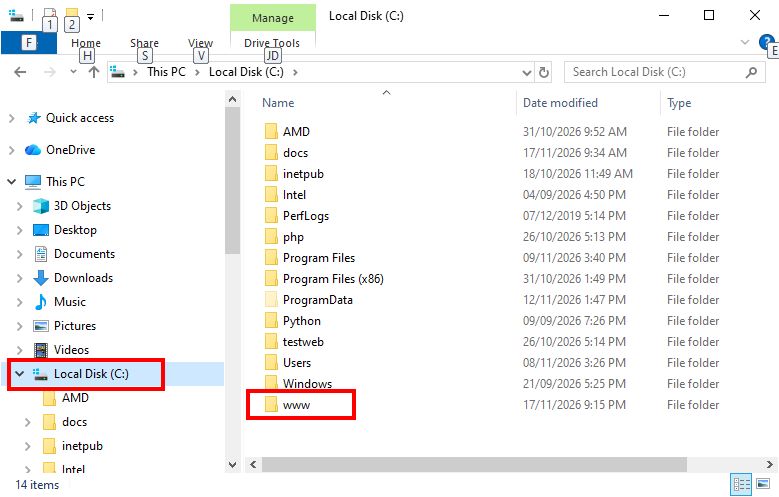
C:\www\.In the Claude app, start a New session and enter the following prompt:
Project folder: C:\www\
Delete index.php.
Write a new, beautiful single-page landing website with the title: "Welcome to my personal blog".
Now go back to your web browser and refresh http://localhost:8090 - you will see your brand-new website!
7 Begin Your First PHP Web Application
Now let's build a full database-backed PHP web application. Start a New session and use the following template as your initial prompt:
Tech Stack:
php, sqlite (high concurrency: wal mode, sync normal, temp=ram, foreign key off, busy time 10s, transaction BEGIN IMMEDIATE), universal OS font Segoe UI, icon=local host font awesome. Sqlite db auto-created inside /App_Data/ (use "local.db" on localhost/127.0.0.1 and "prod.db" on live server; auto-generate .htaccess & web.config in /App_Data/ to deny public download).
Auto-upgrade the SQLite schema on startup: track the schema version with PRAGMA user_version and apply only the new changes in order (new tables, new columns, indexes), so an existing prod.db on the live server is upgraded without losing data. Never require deleting the database.

Local Live Host: http://localhost:8090/
Project Folder: C:\www\

After completed, fully test the website for bugs using mcp-browser.

Project Requirements:
<<write the requirements here>>
What Are "Project Requirements"?
Project Requirements describe the specific application or features you want the AI to build. For example:
Build a landing page that serves as the system navigation main menu to sub-system.

Sub-System 1: build a billing system. add print bill feature.

Sub-System 2: to-do list

Sub-System 3: simple membership system. add print membership profile
When combined with the tech stack template, your complete prompt will look like this:
Tech Stack:
php, sqlite (high concurrency: wal mode, sync normal, temp=ram, foreign key off, busy time 10s, transaction BEGIN IMMEDIATE), universal OS font Segoe UI, icon=local host font awesome. Sqlite db auto-created inside /App_Data/ (use "local.db" on localhost/127.0.0.1 and "prod.db" on live server; auto-generate .htaccess & web.config in /App_Data/ to deny public download).
Auto-upgrade the SQLite schema on startup: track the schema version with PRAGMA user_version and apply only the new changes in order (new tables, new columns, indexes), so an existing prod.db on the live server is upgraded without losing data. Never require deleting the database.

Local Live Host: http://localhost:8090/
Project Folder: C:\www\

After completed, fully test the website for bugs using mcp-browser.

Project Requirements:

Build a landing page that serves as the system navigation main menu to sub-system.

Sub-System 1: build a billing system. add print bill feature.

Sub-System 2: to-do list

Sub-System 3: simple membership system. add print membership profile
Tip: The Claude desktop app also has its own built-in browser, which shows the testing in a panel right beside the chat and gives a different development experience. You can switch to it whenever you like by replacing using mcp-browser with using the built-in browser in your prompt. Either one can accomplish the task.
Once the AI finishes building and testing the app, go back to your browser and visit http://localhost:8090 to use your new PHP web application.
8 How to Continue or Update Your Web Application
Whenever you want to add new features, fix issues, or refine the existing project, start a new prompt using this update template:
Improve the following project.

Tech Stack:
php, sqlite (high concurrency: wal mode, sync normal, temp=ram, foreign key off, busy time 10s, transaction BEGIN IMMEDIATE), universal OS font Segoe UI, icon=local host font awesome. Sqlite db auto-created inside /App_Data/ (use "local.db" on localhost/127.0.0.1 and "prod.db" on live server; auto-generate .htaccess & web.config in /App_Data/ to deny public download).
Auto-upgrade the SQLite schema on startup: track the schema version with PRAGMA user_version and apply only the new changes in order (new tables, new columns, indexes), so an existing prod.db on the live server is upgraded without losing data. Never require deleting the database.

Local Live Host: http://localhost:8090/
Project Folder: C:\www\

After completed, fully test the website for bugs using mcp-browser.

New project Requirements/Updates:

<<write your new requirements here>>
9 Upload (Deploy) Your Website to the Internet
So far, your website runs only on your own computer at http://localhost:8090. To let other people see it, you need to upload the files to an online web server (for example, a shared hosting account).
-
Go to the project folder
C:\www\, or open File Explorer and navigate to This PC > Local Disk (C:) > www. -
Upload all the files and folders to your online web server, except the SQLite data folder (
App_Data).
Why skip the SQLite folder? It contains your local test database (local.db). The live server creates its own database (prod.db) automatically, so uploading the local folder could overwrite or mix up your live data.
Uploading Updates and New Features
Whenever there is an update or a new feature, you can either:
- Ask the AI which files were added or changed - it will list the files that need to be uploaded; or
- Simply upload everything again (again, except the SQLite data folder
App_Data).
Project Folder: C:\www\
List all the new and modified files from this update that I need to upload to the online web server. Exclude the /App_Data/ folder.
How to Upload
You can upload the files using your web hosting provider's online File Manager (for example, in cPanel or Plesk), or with an FTP client such as FileZilla.
Note: The exact steps for uploading files differ greatly between web hosting providers. Please refer to your hosting provider's own instructions or help guides.